Strick.PlusCon
Menu, MenuOption classes
The Menu and MenuOption classes provide a way to create a simple menu structure for a console app.
A menu can have one or more Options, and optionally a Title, Subtitle and Prompt.
The titles show at the top of the menu, above the options.
The prompt shows beneath the options, and the cursor is located next to the prompt while
awaiting user input.
Horizontal alignment of the Title and Subtitle can be controlled using the TitleAlignment
and SubtitleAlignment properties, respectively. The default for both is HorizontalAlignment.Center.
There are three types of menu options:
- Invokable Options. Either invoke a submenu or an Action
(a method that takes no arguments and returns no value). Use the
MenuOptionclass. - Separator Options. Shows as an option with NO key. Use the
MenuSeperatorclass. Setting theCaptionproperty to any single character (e.g. “-“) will repeat that character for the width of the menu (or column in a multi-column menu). - Exit Menu Options. Exits the menu when selected/invoked by the user.
Use the
MenuBackOptionclass.
The user selects, or invokes, an option by pressing the “key” (typically a letter or digit) shown next to the option. Options can have multiple keys associated with them, but only the first key will be displayed on the menu.
A menu can have multiple ExitKeys associated with it. An “Exit Key” is a key that will close the menu.
The default ExitKeys for a menu are: 0 (the digit zero), Space (“ “), Escape,
Enter, and Backspace.
These can be overridden via the ExitKeys property.
If a prompt is not desired, set the Prompt property to null (as opposed to setting Prompt.Text).
Menu myMenu = new("Example Menu");
...
myMenu.Prompt = null; //remove the prompt

//these don't work
myMenu.Prompt.Text = null; //results in an exception
myMenu.Prompt.Text = ""; //results in an exception
Key collisions
If an option in a menu’s Options collection contains a key in its Keys collection that is also
contained in the menu’s ExitKeys collection, the menu option takes precedent.
If two (or more) options in the a menu’s Options collection contain the same key in their
Keys collection, the option with the lowest index within the Options collection
(i.e. the one added first) will take precedent.
Multi-column
A menu can have multiple columns. Use the ColumnCount property to set the number of
columns for a menu (the default is 1), and the GutterWidth property to control
the spacing between columns (the default is 3).
For multi-column menus, the options are shown in a row, column order.
Use MenuSeperator options to create “headers” and groupings to help keep larger
menus simply and intuitively organized.
Examples
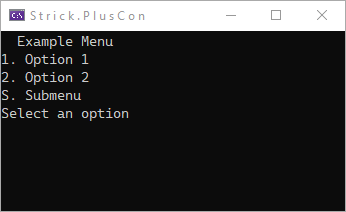
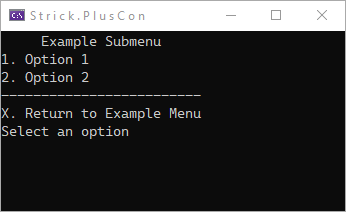
Example 1 - Basics
Menu subMenu = new("Example Submenu");
//lambda
subMenu.Add(new MenuOption("Option 1", '1', () =>
{
	CLS();
	WL("This is Example Submenu Option 1", Color.Red);
	RK("press a key to return to the menu...");
}));

//lambda
subMenu.Add(new MenuOption("Option 2", '2', () =>
{
	CLS();
	WL("This is Example Submenu Option 2", Color.LimeGreen);
	RK("press a key to return to the menu...");
}));

subMenu.Add(new MenuSeperator("-"));
subMenu.Add(new MenuBackOption("Return to Example Menu", 'X'));


Menu myMenu = new("Example Menu");
myMenu.Add(new MenuOption("Option 1", '1', ExampleMenuOption1));
myMenu.Add(new MenuOption("Option 2", '2', ExampleMenuOption2));
myMenu.Add(new MenuOption("Submenu", 'S', subMenu));

myMenu.Show();

private static void ExampleMenuOption1()
{
	CLS();
	WL("This is Example Menu Option 1", Color.Red);
	RK("press a key to return to the menu...");
}

private static void ExampleMenuOption2()
{
	CLS();
	WL("This is Example Menu Option 2", Color.LimeGreen);
	RK("press a key to return to the menu...");
}
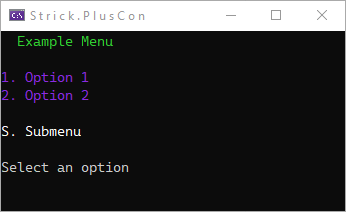
Example 2 - Styling
Colors for menu titles and menu options can easily be set.
At the menu level, both titles (Title, Subtitle) and Prompt have Style properties.
The menu has an OptionsStyle property, which sets the style for ALL menu options.
Individual options can override the menu-level style via their Style property.
The Style properties are all TextStyle objects.
Menu subMenu = new("Example Submenu", "-");
subMenu.Title!.Style.SetGradientColors(Color.Silver, Color.SlateGray, Color.Silver);
subMenu.Title!.Style.BackColor = Color.White;
subMenu.Title!.Style.Reverse = true;
subMenu.Subtitle!.Style = subMenu.Title.Style;
subMenu.OptionsStyle = new(Color.DodgerBlue);
subMenu.Prompt!.Style.ForeColor = Color.White;

//lambda
subMenu.Add(new MenuOption("Option 1", '1', () =>
{
	CLS();
	WL("This is Example Submenu Option 1", Color.Red);
	RK("press a key to return to the menu...");
}));

//lambda
subMenu.Add(new MenuOption("Option 2", '2', () =>
{
	CLS();
	WL("This is Example Submenu Option 2", Color.LimeGreen);
	RK("press a key to return to the menu...");
}));

subMenu.Add(new MenuSeperator("-"));
subMenu.Add(new MenuBackOption("Return to Example Menu", 'X'));
subMenu.Options[subMenu.Options.Count - 1].Style = new(Color.Silver);


Menu myMenu = new("Example Menu", " ");
myMenu.Title!.Style.ForeColor = Color.LimeGreen;
myMenu.OptionsStyle = new(Color.BlueViolet);
myMenu.Add(new MenuOption("Option 1", '1', ExampleMenuOption1));
myMenu.Add(new MenuOption("Option 2", '2', ExampleMenuOption2));
myMenu.Add(new MenuSeperator(""));
myMenu.Add(new MenuOption("Submenu", 'S', subMenu));
myMenu.Options[myMenu.Options.Count - 1].Style = new(Color.White);
myMenu.Add(new MenuSeperator(""));

myMenu.Show();

private static void ExampleMenuOption1()
{
	CLS();
	WL("This is Example Menu Option 1", Color.Red);
	RK("press a key to return to the menu...");
}

private static void ExampleMenuOption2()
{
	CLS();
	WL("This is Example Menu Option 2", Color.LimeGreen);
	RK("press a key to return to the menu...");
}

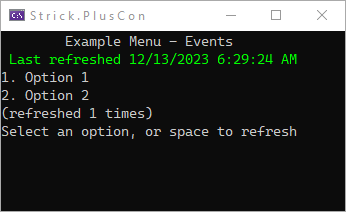
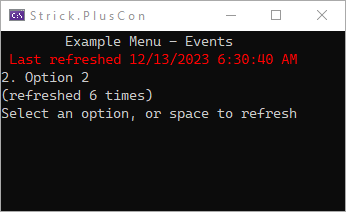
Example 3 - Events
The Menu and MenuOption classes both have a BeforeShow event. As the name suggests,
the event is fired before the Menu or MenuOption is rendered. In the event handler
for Menu, you can manipulate any of the menu’s properties or options. In the event handler
for the MenuOption, you can manipulate any of the option’s properties.
Menu myMenu = new("Example Menu - Events", " ");
myMenu.Add(new MenuOption("Option 2", '2', ExampleMenuOption2));
myMenu.Add(new MenuSeperator(""));
//BeforeShow event for menu option
myMenu.Options.Last().BeforeShow += MenuCount_BeforeShow;

myMenu.ExitKeys.Remove(' '); //space
myMenu.Prompt!.Text = $"{myMenu.Prompt!.Text.Trim()}, or space to refresh ";

//BeforeShow event for menu
myMenu.BeforeShow += Menu_BeforeShow;

myMenu.Show();

//Event handler for menu
private static void Menu_BeforeShow(object? sender, EventArgs e)
{
	if (sender is null) return;

	Menu m = (Menu)sender;
	var st = m.Subtitle;
	if (st == null)
	{
		st = new(" ");
		m.Subtitle = st;
	}
	var t = DateTime.Now;
	st.Text = $"Last refreshed {t.ToString("G")}";
	if (t.Second > 29)
	{ st.Style.ForeColor = Color.Red; }
	else
	{ st.Style.ForeColor = Color.Lime; }

	//you can dynamically manipulate the options
	if (m.Options.Count > 2)
	{ m.Options.RemoveAt(0); }
	else
	{ m.Options.Insert(0, new MenuOption("Option 1", '1', ExampleMenuOption1)); }
}

//Event handler for menu option
private static void MenuCount_BeforeShow(object? sender, EventArgs e)
{
	if (sender is null) return;

	MenuOption opt = (MenuOption)sender;

	int count = 1;
	if (!string.IsNullOrWhiteSpace(opt.Caption))
	{
		count = int.Parse(opt.Caption.Split(' ')[1]) + 1;
	}
	opt.Caption = $"(refreshed {count} times)";
}

private static void ExampleMenuOption1()
{
	CLS();
	WL("This is Example Menu Option 1", Color.Red);
	RK("press a key to return to the menu...");
}

private static void ExampleMenuOption2()
{
	CLS();
	WL("This is Example Menu Option 2", Color.LimeGreen);
	RK("press a key to return to the menu...");
}
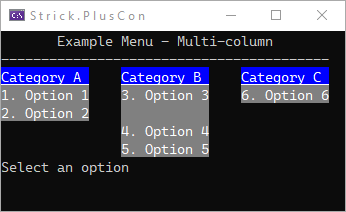
Example 4 - Multi-column
TextStyle CatStyle = new TextStyle(Color.White, Color.Blue) { Underline = true };
Menu menu = new Menu("Example Menu - Multi-column", "-");
menu.OptionsStyle = new TextStyle(Color.White, Color.Gray);
menu.ColumnCount = 3;
menu.GutterWidth = 4;

//"headers"
menu.Add(new MenuSeperator("Category A"));
menu.Options[^1].Style = CatStyle;
menu.Add(new MenuSeperator("Category B"));
menu.Options[^1].Style = CatStyle;
menu.Add(new MenuSeperator("Category C"));
menu.Options[^1].Style = CatStyle;

//row 1
menu.Add(new MenuOption("Option 1", '1', ExampleMenuOption1));
menu.Add(new MenuOption("Option 3", '3', ExampleMenuOption1));
menu.Add(new MenuOption("Option 6", '6', ExampleMenuOption1));

//row 2
menu.Add(new MenuOption("Option 2", '2', ExampleMenuOption1));
menu.Add(new MenuSeperator(" "));
menu.Add(new MenuSeperator(""));

//row 3
menu.Add(new MenuSeperator(""));
menu.Add(new MenuOption("Option 4", '4', ExampleMenuOption1));
menu.Add(new MenuSeperator(""));

//row 4
menu.Add(new MenuSeperator(""));
menu.Add(new MenuOption("Option 5", '5', ExampleMenuOption1));

menu.Show();

private static void ExampleMenuOption1()
{
	CLS();
	WL("This is Example Menu Option 1", Color.Red);
	RK("press a key to return to the menu...");
}